Showing posts with label Tutorials. Show all posts

Thursday, October 11, 2012

Tissue Batik using Re-Inkers

I felt like getting inky fingers today and here are the resuts.
It is drying now as I type but I took some progress shots.


This is a simple technique using ordinary tissue paper, a stamp with solid areas, Versamark ink and clear embossing powder and a couple of colors of re-inkers.

You'll also need a flat plastic tray or cookie sheet to protect your work area

once you start with the coloring step.


First up, stamp your image randomly on the tissue paper with Versamark and then sprinkle with clear embossing powder and heat. I chose the sun stamp.


Next drop on two colors of re-inkers.  I chose yellow and orchid. You can wait for them to spread or lift the tissue and re-position to absorb color from the plastic underneath.


If you would like a negative effect sandwich the wet sheet between two dry sheets of tissue and run the brayer across. Lift off carefully to sepearate the pieces.


You can now hang your batik up to dry and feel like you are on a beach in Bali.


Have fun playing, and if you like, you can post a link to your results on my Blogspot.

Here is an ATC  Background I made with some of the scraps. 


Sunday, September 30, 2012

Fan-Fold Pop-Out Book


Supplies:
Credits.
Papers: The Far East Stack from DCWV
Stamps:  Some Unknown- Wiki C.A.P.S  Asian Dragon Clear Stamp
www.wikicaps.com

All Night Media, Chinese Calligraphy,  All Night Media Chinese  Dragon,  Kodomo Inc, Chinese coin, Great Impressions, #B125
Inks:  Versamark Clear, VersaMagic Cornucopia, Brilliance Pearlescent Beige, Adirondack Dye inks, Cranberry and Caramel, Stampin’ Up Whisper White.


2  sheets- 12X12 matched scrapbooking pages
2 sheets, more of co-ordinating  scrapbook paper.
or you can use matching papers from any source.
Cut as described in steps below.
2 - 5 ½ X  5 ½  pieces book end thickness cardboard (I used packaging scraps)

Book Covers:
Cardboard, as above.
From the matching scrapbooking paper cut:
 2- 6½" square pieces with a  motif or feature for the covers.  I featured dragons from the print for mine.
2X 6" squares plain paper or cardstock for inside covers.
1X 8" square with print on one side and plain on the back side for fan pop-out.

Glue the cardboard onto the  6½" front and back cover pieces,  leaving an even margin around them.  I use Fabritac glue as it gives more room for re-positioning and it dries clear and will not buckle the paper. Trim across the corners (as shown) and fold in the edges.
Cover the inside and hide the edges  with the  6" sq. plainer matching paper or cardstock. Book covers finished.  Set aside for now.

Now the fun part of decorating the fan-fold.

 On the white side of the 8" piece of co-ordinating paper, stamp your theme ( I used dragons, calligraphy and oriental coin stamps) in Versamark ink and emboss with clear powder for the  images you wish to appear as distressed .  Stamp calligraphy and coins in Caramel and Cranberry. You can add more dragons in a white ink, if desired.

For brayering  the background, choose inks that will match your paper as closely as possible.  I chose dye inks Cornucopia, Cranberry and Caramel and gave a final coat of Brilliance Pearlescent Beige. My brayered and stamped piece is on the left and the design paper I matched is on the right.

 Using  the  brayer start with a light yellow and brayer the entire sheet.  Roll off the brayer between colors. Make the final layer a Brilliance Ink for a pearly finish. Let the sheet dry well then fold per folding instruction sheet.


Orient the design so that it appears right side up when the fan unfolds and slit to the center on line indicated.  Fold,  valley, mountain until it forms a small triangle.  Attach front and back covers evenly as per fold sheet.


Embellish with quotes printed on tissue and torn,  or stamped quotes.


Tie yarns around with beads attached and embellish with crimped cardboard, fiber and a brass coin or figure.


I'll look forward to hearing your comments and seeing your creations.  Please post a link to your creations...I would love to see them.


Thursday, April 12, 2012

Moving Window Template

When making cards or ATC's it is sometimes hard to visualize how the paper will appear
behind a solid shape.


Here is when a window template in the exact size of that part of your project,
that you can move across the paper background will show you how it will appear
before you cut it out.

Use the template for the card (print an extra copy so you can cut it open)
to make a window template.  Move it across your chosen background
until you see a pleasing effect.


I use this method with a hollow 2.5" X 3.5: hollow frame when I make ATC's


It really works to isolate a pleasing aspect of the image you have chosen.

The full image.


The waterfall isolated for an ATC Background.


Thursday, March 22, 2012

Creating a Specific Size Circle

For the last Challenge on OSA,  I needed a circle  3 ¾ “ to mat a 3 ½ “ Washi paper which  I   had cut with the largest of  the small Circle Nestabilities set ( I don't have the large circles, yet )  so I  thought of going on Google for a circle template.  My problem was it needed to be black.
I decided to make my own circle template in my Kaleidoscope program,
Dazzling Reflections.


I then opened it in word and re-sized it to 3 ¾” and printed it out.  I wasted less printer ink because the  washi paper layer covered the center that was white.  I cut it out with scissors and found,  I  did have to take a   black re-inker  and a brush and paint the outside of the circle to match the black card stock.    Feel free to use the template I created.


Thursday, March 1, 2012

Using Parts of a Stamp

Sometimes if you look at your stamps in a different way you can use
part of them  for a project to alter the style or form, and create a whole
new look.
Most experienced stampers know how to isolate the part of a stamp they want to feature by creating a mask.  This can be a positive or a negative mask.
For my  aqua Oriental screen  I created a faux lacquered look with a Holly Berry House
House- medallion stamp, by making a negative of the arch and stamping inside it with Versamark ink.
I laid my paper on top of the stamp and pressed it all over with my fingers, making sure it didn't shift position,  then  embossed it with fine black powder.  I used a similar method of stamping as seen for stamping the background in this video.

http://www.metacafe.com/watch/6010775/how_to_learn_rubber_stamping_techniques_masking/


I then ran it through a mini-crimper.  The result was quite a realistic impression of an oriental screen.  For the front image I used a Marieandme  bamboo- pine- plum- stamp and stamped  only the bamboo in  versamark ink and then stacked it where the top of the bamboo began and stamped again (just the cane) then embossed it in  fine black embossing powder.

scroll down to bottom

 Here is the finished screen plus one I made with Best Creations Inc oriental print paper.
The single crane is from a Hero Arts  stamp of multiple cranes.  I inked up one on the end
and stamped it individually.


Wednesday, February 22, 2012

Paper Crafter’s Optimizing PC Use


1. Using the Search Feature :

Many of us use our computers for saving images and download so many,
  it is sometimes difficult to locate the one we want without a big long
  search for it. 
 The trick is to give it a simple category name when saving it and save it to a sub-folder  in your Crafts folder that has an easily remembered name. 
So if you have a main folder called Papercrafts make a Sub folder eg.,Oriental - save all your images there  in more subfolders eg., Geishas,Cranes, Samurais, Backgrounds. etc

Now if you forget where you saved your Samuaris you can do a Search in the main Paper Crafts Folder.  Search Bar is located on top right of Window. Enter: Samauris
 There, you see your Samurai…now R Click on  the image, then Properties and
look at Location. If it is a long file name use your left arrow  to read across it.
 Now you can go and find the whole folder.
You can locate most any file this way.

 2. Customize Your Screensaver

 You can also make your main screensaver into a slide show of all your papercaft image files.
  Say, you have a folder that you have named Cut-Outs where you save all your vintage photos or collage pretties. If you would like to be reminded of what you have in there:

Go to Contol Panel:
Click on Personalization
Change Screensaver
In the drop down box select Photos
Click Settings
 then Browse
Find the folder you want to show, and click on it.
You can select the theme and speed. (I like the collage effect)
Then  Apply.

Now whenever your screensaver comes on you can be reminded of
 all the images you have saved for collage or cardmaking.
 
  1. Side Bar Slideshow
  If you have Vista you can create little slideshows of your craft images.
   Once you have created these they will play on the side of your Desktop and you can be reminded of images you have saved when you see them rotate by.

Control Panel
      Click on Personalization.
      CLICK SideBar
     Add Gadgets to Sidebar
      Slideshow

The small screen will appear in your sidebar.  Now hover the mouse over the top left corner and you will see a little wrench icon. Click on that and from the drop down
 browse and choose a folder and the transition mode.
      Click OK


More info on SideBar Gadgets here:
http://windows.microsoft.com/en-US/windows-vista/Windows-Sidebar-and-gadgets-overview


Suzanne Delaney

Thursday, January 19, 2012

How To Make A Oriental Paper Knot

CLICK TO ENLARGE

Design Your Own Washi Papers

Make Your Own Oriental Design Paper

 Supplies:

  1. Mini Brayers or Rubber Brayer
  2. Brilliance inks (assorted shades)
  3. Oriental Stamps (small designs)
  4. Plain sheet 81/2 11 paper
  5. White cardstock
Masking Paper:
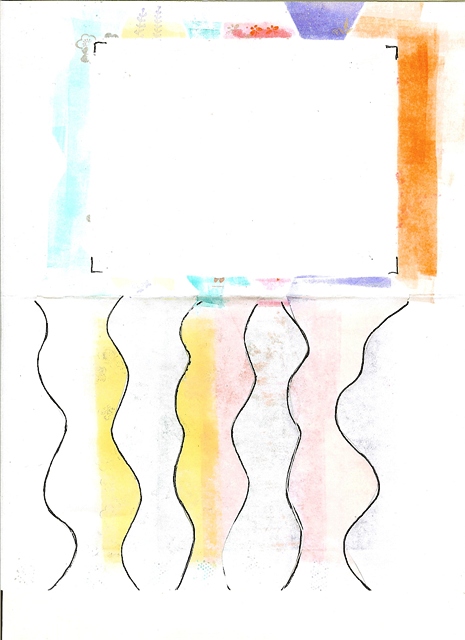
Fold the sheet of paper in half, Free hand draw
Approx. six evenly spaced wavy lines and cut each one
up to the center of the page. 

Place half a sheet of white cardstock on the top half of the page and close the cut strips of paper over it.  Ink your brayer with the first shade of Brilliance ink and open the first strip of paper and brayer the cardstock underneath, Close the strip of paper and open the next one, brayer the next color and close the strip and continue across the page until you have colored  all the cardstock.You can use mini brayers, one for each color or use just the end of a large rubber brayer and run the color off between each application.


The next step is to use your gold, silver and copper inks
And using the masking strips again stamp your chosen designs on each strip of color.


Use the following grid as a guide for colors and stamp choices.


Click on the picture to enlarge.


Here is a card made from the results.


You can try endless combinations of inks and stamps.

I’ll look forward to your results.

Please leave a comment below with a link to your artwork and have fun creating.